Exporting
Data from REsearch
Hawaii
Using the Report
Format to setup the Download Format
Before
you can download data, you must first setup the download format. This is a one-time action that you will need
to do. The format must be setup as shown
in this section for the Focus1st application to understand the format.
Once
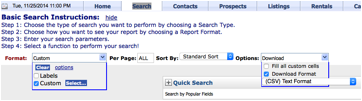
you’ve logged into the REsearch Hawaii system, in the
“Format:” area, next to the “Options:” area push the down arrow ![]() and select “Download Format” and choose the “(CSV) Text Format” option as shown above.
and select “Download Format” and choose the “(CSV) Text Format” option as shown above.
Note: Click
the arrow button to the right of the “(CSV) Text Format” option ![]() ,
to remove the extra options, to better see your selection.
,
to remove the extra options, to better see your selection.
Then next
to the “Format:” area, push the down arrow ![]() and select the “Custom” option and then select the “Select…” link. Once you
select the “Select…” link, you will see a screen
similar to that shown below.
and select the “Custom” option and then select the “Select…” link. Once you
select the “Select…” link, you will see a screen
similar to that shown below.
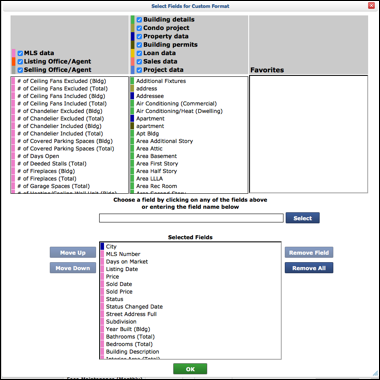
This
will show you all the fields you can select to create your custom format. To add fields, select the field in one of the
tables at the top of the screen. Once you select that field, you will see it
added to the “Selected
Fields” table at
the bottom. Add the following fields
shown below. Note that most of the
fields can be found in the MLS data area (shown in pink).
·
Bathrooms
(Total)
·
Bedrooms
(Total)
·
Building
Description
·
City
·
Days
on Market
·
Interior
Area (Total)
·
Listing
Date
·
MLS
Number
·
Price
·
Sold
Date
·
Sold
Price
·
Status
·
Status
Changed Date
·
Street
Address Full
·
Subdivision
·
Year
Built (Bldg)
Once
you have added the fields, save the results by pressing the ![]() button.
button.
You
are now ready to do your MLS search and export your results.
REsearch Hawaii
In
selecting data from REsearch Hawaii MLS, be sure to
select “all status” activity for the last two years. Then to download data, in the “Format:” area, next to the “Options:” area push the down arrow ![]() ,
select “Download
Format”, and choose
the “(CSV)
Text Format” option
as shown previously.
,
select “Download
Format”, and choose
the “(CSV)
Text Format” option
as shown previously.
Then next
to the “Format:” area, push the down arrow ![]() and select the “Custom” option.
and select the “Custom” option.
Note:
You need only to define the “custom format” once.
Additionally,
since Focus1st will only use the last two years of data, you may limit the
amount of data downloaded by setting a listing date. Set the listing date to be three year previous,
to make sure that you include all data for the last two years.
You
should also make your normal selection choice by selecting other options that
you would normally select in doing a CMA, looking at activity in specific
subdivisions is a good starting point.
Once
you’ve selected the search criteria, press the ![]() button located at the bottom of the screen to
download the results.
button located at the bottom of the screen to
download the results.
The
download will now start. Once the
download starts, you will be asked if you want to save the file. Select the save option and then choose a file
name.
Be sure
to remember where you save your file.
This is the exported file that will be used to create your graphs.
You
will see dialog boxes similar to what you see below.

Once
you have saved your exported file, you are ready to run the application.
When
you run the application you will need to point to the exported data file, so
make sure that you’ve placed the file in an easy to find place.
For
instructions on how to run the application, be sure to see the tutorials located at http://www.focus1st.com.