Exporting
Data from MRIS – East Coast Area
MRIS –
Metropolitan Regional Information Service
In selecting data from MRIS be sure to select the options below:
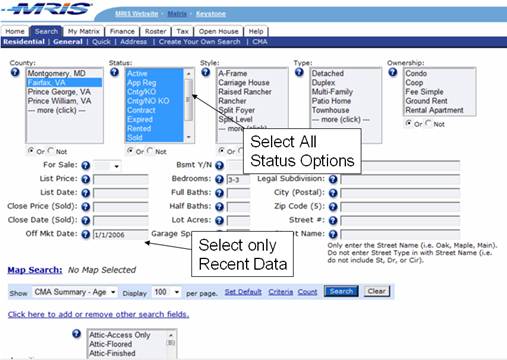
Select all the Status options by holding down the
<control> key and selecting all the options. To avoid download lots of unneeded data,
you may also place a recent date in the “Sold Date” box. Here we’ve placed 1/1/2006 ( this
assumes the search is being done in 2008, only the last two years of data is
used in the graphs). These options
will make sure that all the data that is needed to create the appropriate
graphs, is collected.
Note: There
may be problems with exporting both Sold/Withdrawn data along with Active
Data. This is because if you set
the Sold Date, no Active properties are found. This means that you will want to do two
searches. One with
the Sold, Withdrawn, and Expired data and another search with just the Active
data. You will then merge
the two files. Two read in the two
files use the Focus1st menu and select Configure. Then select the “Multiple Export
File Read” option.
You should also make your normal selection choice by selecting other options that you would normally select in doing a CMA. In this example, we’re only looking at 3 bedroom selections.
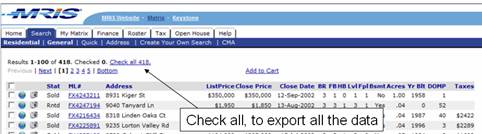
Once you’ve selected the data, you are ready to search your results. When you’ve obtained your search results, you are ready to select the data you want to export. Select the “Check all” to export all the data.
Once you’ve selected the data, you are ready to
export the results. To export the
results, select the ![]() button as shown below.
button as shown below.

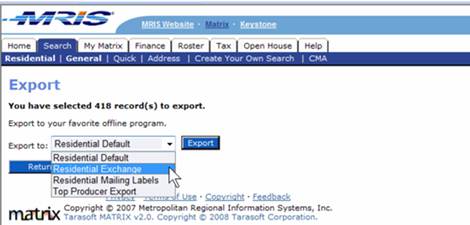
When you select the ![]() button, the dialog shown below will be
displayed. Select the
“Residential Exchange” option.
Then push the
button, the dialog shown below will be
displayed. Select the
“Residential Exchange” option.
Then push the ![]() button.
button.
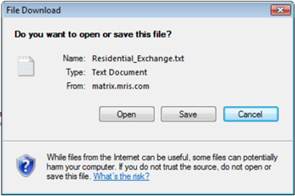
Once you push the ![]() button, you will be asked if you want to
save the file. Select the save
option and then choose a filename.
button, you will be asked if you want to
save the file. Select the save
option and then choose a filename.
Be sure to remember where you save your file. This is the exported file that will be used to create your graphs.
You will see dialog boxes similar to what you see below.
Once you have saved your exported file, you are ready to run the Neighborhood Buying Patterns application. When you run the application you will need to point to the exported data file, so make sure that you’ve placed the file in an easy to find place. For instructions on how to run the Neighborhood Buying Pattern application, be sure to see the Neighborhood Buying Pattern manual (installed on your desktop when you installed the application).