Exporting Data from NJ, Cape May County -
Paragon 5
Paragon 5 MLS
When setting up your custom export in Paragon, you must
first do a search.
In selecting data from Paragon 5, be sure to select the
options below:
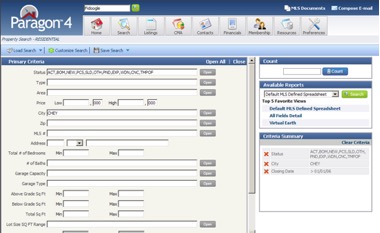
·
Make sure that all the status options are
selected. This option will make
sure that all the data that is needed to create the appropriate graphs, is
collected.
·
Additionally, to minimize the amount of data
downloaded, you may select the “Closed Date” going back two full
calendar years.
·
Now select a neighborhood by subdivision name or
map search. You should also make your normal selection choice by selecting
other options that you would normally select in doing a CMA. As mentioned earlier, looking at
activity in specific subdivisions is a good starting point.
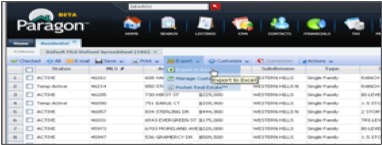
Once you’ve selected the search criteria, press the  button to see the results as shown
below.
button to see the results as shown
below.
Customize to setup the Export Format
Before you can export data, you must first setup the
Export format. This is a one time action that you will need
to do. The format must be setup as
shown in this section for the Focus 1st application to understand the
format.
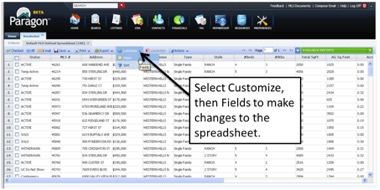
Once you are in the search spreadsheet screen, use the ![]() button and the Fields menu item, to
customize the spreadsheet. Once
you’ve pressed the graphic you will see a dialog box as shown below.
button and the Fields menu item, to
customize the spreadsheet. Once
you’ve pressed the graphic you will see a dialog box as shown below.
Under “Name”, rename the spreadsheet to
“Focus 1st”
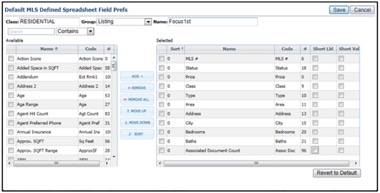
Start from the default spreadsheet and add fields shown
below.
First select the name from the “Available”
table (on the left) and add it into the “Selected” table (table on
the right) by using the ![]() button. You will see the item move to the table
on the right.
button. You will see the item move to the table
on the right.
Do this for each of the options as shown in the graphic
above.
Be sure that you create the spreadsheet with the fields that
are shown below (additional fields will be ignored).
|
· Address · Approx SqFt |
|
· Approx Year Built |
|
· Area |
|
· Bedrooms |
|
· City |
|
· Closing Date |
|
· Days on Market |
|
· Full Baths |
|
· Listing Date · MLS # |
|
· Price |
|
· Sold Price |
|
· Status |
|
· Type |
|
|
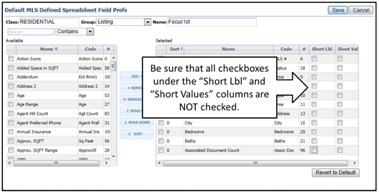
As shown above, be sure that all the “short
labels” and “short values” are NOT check. If they are, then “uncheck”
them. Once you have completed the
task above, save the results by pressing the "Save" button. You are now ready to do your MLS search
and export results.
Note that this spreadsheet may need to be done
for the Condo and Land spreadsheet as well.
Now you are ready to export the results. To export the results, select the ![]() drop down button. Then select the “Export to
CSV” menu item as shown below.
drop down button. Then select the “Export to
CSV” menu item as shown below.
When you select the “Export to CSV” menu item,
you will see a screen similar to the image below.
Under “select spreadsheet” be sure to select
the “Focus 1st” export option from the dropdown.
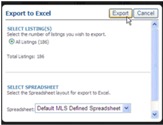
Select export to save your file. Notice that you may position your cursor
in the “File Name” field and rename the file to be created.
Once you have saved your exported file, you are ready to
run the application.
When you run the application
you will need to find the exported data file, so be aware of where the file has
been placed. It may make sense to
move the file to a location that is easier to access.
For instructions on how to run the application, be sure to
see the tutorials at https://www.youtube.com/c/Focus1stLLCVisualPricing